As you all may know, Grass GIS is a great software for academic purposes and using it in an environment like R/RStudio is a very good idea, because you can share your code and other people can reproduce the tasks you did.
Unfortunatly the r-package used for this interactiuon between R and Grass can have some problems when using Windows as an Operating System.
Luckily the creator, Roger S. Bivand provided a safe solution, that should be used initialy so you can work without a problem. Other users at the support board also added some lines and i hope it this code can help maybe save you some time in the near future:
First of all, you need to find your GrassGIS installation folder. When using Windows i highly recomend using the OSGEO4W installation, because it provides you some other nice tools that may be needed. So your installation folder Grass is perhaps included in OSGEO4W64, but you better check if this is true. Otherwise you need to change the path in the following code. Also you need to check which version of grass is installed and which version of python is availabe in OSGEO4W, otherwise it may not work as intended. For me its Python37 and grass78. Be aware that grass may have different folder path for different versions like "grass-6.4.3", "grass78" or even "GRASS GIS 7.8" (having dots in filenames/paths is just not a good idea).
library(rgrass7)
use_sp()
osgeo4w.root<-"C:\\OSGEO4W64"
Sys.setenv(OSGEO4W_ROOT=osgeo4w.root)
# define GISBASE
grass.gis.base<-paste0(osgeo4w.root,"\\apps\\grass\\grass78")
Sys.setenv(GISBASE=grass.gis.base)
Sys.setenv(GRASS_PYTHON=paste0(Sys.getenv("OSGEO4W_ROOT"),"\\bin\\python.exe"))
Sys.setenv(PYTHONHOME=paste0(Sys.getenv("OSGEO4W_ROOT"),"\\apps\\Python37"))
Sys.setenv(PYTHONPATH=paste0(Sys.getenv("OSGEO4W_ROOT"),"\\apps\\grass\\grass78\\etc\\python"))
Sys.setenv(GRASS_PROJSHARE=paste0(Sys.getenv("OSGEO4W_ROOT"),"\\share\\proj"))
Sys.setenv(PROJ_LIB=paste0(Sys.getenv("OSGEO4W_ROOT"),"\\share\\proj"))
Sys.setenv(GDAL_DATA=paste0(Sys.getenv("OSGEO4W_ROOT"),"\\share\\gdal"))
Sys.setenv(GEOTIFF_CSV=paste0(Sys.getenv("OSGEO4W_ROOT"),"\\share\\epsg_csv"))
Sys.setenv(FONTCONFIG_FILE=paste0(Sys.getenv("OSGEO4W_ROOT"),"\\etc\\fonts.conf"))
# call all OSGEO4W settings
system("C:/OSGeo4W64/bin/o-help.bat")
# create PATH variable
Sys.setenv(PATH=paste0(grass.gis.base,";",
"C:\\OSGEO4~1\\apps\\Python37\\lib\\site-packages\\numpy\\core",";",
"C:\\OSGeo4W64\\apps\\grass\\grass78\\bin",";",
"C:\\OSGeo4W64\\apps\\grass\\grass78\\lib",";",
"C:\\OSGeo4W64\\apps\\grass\\grass78\\etc",";",
"C:\\OSGeo4W64\\apps\\grass\\grass78\\etc\\python",";",
"C:\\OSGeo4W64\\apps\\Python37\\Scripts",";",
"C:\\OSGeo4W64\\bin",";",
"c:\\OSGeo4W64\\apps",";",
"C:\\OSGEO4~1\\apps\\saga",";",
paste0(Sys.getenv("WINDIR"),"/WBem"),";",
Sys.getenv("PATH")))
# initial again to be sure
use_sp()
#create a location so you can start with grass tasks
loc <- rgrass7::initGRASS(gisBase=grass.gis.base,
home=tempdir(),
mapset='PERMANENT',
override=TRUE)
I have also used Linux (Manjaro KDE) and it was not necessary to have this code for rgrass7 to work. rgrass7 just found the grass files on its own.
Run this code anytime you start up your R Environment.
Today we had our second GIS-meeting online. Attendance was still limited, but at least we have found a rhythm now. Today's meeting was short but informative.
Extracting islands from DEM
We discussed the May topic at length, which could not be covered last time. The solution is posted under the original question.
Raster reprojection in QGIS
Fabian asked an intriguing question. As most QGIS users know, there are at least two ways to reproject a raster layer in QGIS.
1) 'Raster > Projection > Warp' using this tool you can reproject a raster file to a new CRS and save it to a new file.
2) 'Export > Save as' when saving a layer you can assign a new CRS.
You can also use other external tools from GRASS or SAGA to reproject. However, when comparing the results of these ways, you will see that the reprojection results are slightly different. This effect is known in the community (https://gis.stackexchange.com/questions/214757/raster-reprojection-in-qgis-leads-to-different-results), but there appears to be no detailed explanation so far. Apparently the different ways use different tools for the reprojection. We do not know, which one gives the best results. Further research (e.g. QGIS-User-List) would be useful.
Ideas for next meetings
Fabian explained his troubles to connect GRASS 7 with R. He will prepare a little presentation on that topic for the next meeting. We decided to dedicate the next meeting to interfaces of GIS to other software packages.
Martin asked for an introduction to spatial network analyses. This will be our topic for the august meeting. We will prepare a data set and Benjamin agreed on a little intro to that topic. Benjamin also showed us the GAMA-Project, which is an open source software for agent based spatial modelling (https://gama-platform.github.io/wiki/Home). This tool can also be used for network analyses.
High quality test and open data sets are available for free from the Mexican governmental surveying office (https://www.inegi.org.mx/datos/). The problem is, that so far non of us has any archaeological data to combine with these.
We met on May 29th on the platform Big Blue Button. Attendance was a bit sparse, but we had interesting topics.
Link points to fotos
Wassim formulated his problem, that he wants to create a "fotopoints" layer for the ancient city of Bosra (Syria). For the DAIs digital map of Bosra the images of the city from the image archive Arachne are supposed to be linked to points on the map, representing the point of view of the camera. A similar linkage was earlier established for the digital map of Palmyra (https://arachne.dainst.org/project/palmyra-gis).
The solution we took for Palmyra was to add the URL of the image in the Arachne to the attribute table. Since every image in the arachne has its own ID and the URL always has the same structure, this is a quite straightforward matter. It is even possible to store just the ID of the foto and create the URL from that on the fly. For this example I created just a temporary layer representing some imaginary building and a second layer representing three viewpoints to this building (here represented by an SVG symbol for viewpoint from the QGIS standard svg-library).
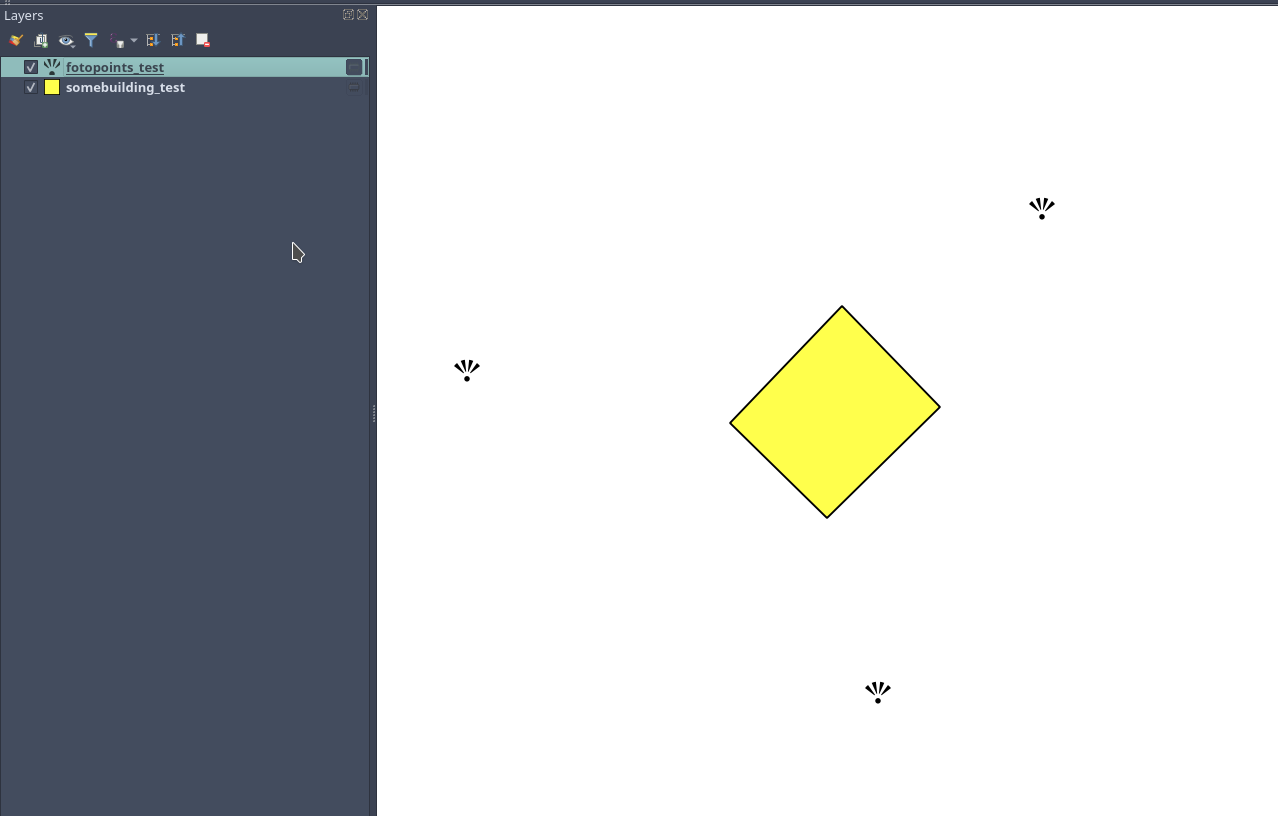
To put in the Arachne-ID and/or the URL you will have to create a suitable field in the attribute table (the layer has to be in editing mode). For the ID a integer field will do, for the URL you will need a text field. The following image shows some random IDs and their corresponding URLs. The fields names are up to you of course.

To open this link directly from QGIS you have to create an "action" for the layer. To do so open the layer properties and select the tier "Actions". Here you will have create a new action by clicking the "+"-Button. Now you can enter the command you want to run with this action. In our case this would look like this.

Now you will have to select the "Run feature action"-Tool in the toolbar. You may have to select the dropdown menu first to select your "Open_URL"-Action. If you have the tool activated and click on a point with a valid URL, it should open this URL now.

The second question was, how to make the point rotate to a certain angles, as to represent the angle of view of the original foto on the map. Here we have to create a new attribute again. Let's call it "rotation". It is useful to make it a decimal number, with two decimal places, if you want to be extra precise. But a 3 digit integer should also do it. Your rotation is stored in degree with 0/360 pointing north.


Now all you have to do is to use this field to rotate your points. This is done in the layer properties in the tier "Symbology". Go to "Rotation" and activate "Data defined override". Here you have to select "Field type" and then select the field you want to use for the rotation value, in our case "rotation". Now the points will be rotated according to the values in your attribute table.

Corona-Satellite-Imagery
No pun intended, but we really discussed the images taken by the Corona/Keyhole-Satellite-Program. This is one of the earliest satellite programs dedicated to take images of more or less the entire earth originally for military purposes and espionage (see https://de.wikipedia.org/wiki/Keyhole). The images date back to the early 1960s and are of particular value to document the change of landscapes over the last 50 years. The images have a quite high ground resolution (about 10 m) and can be used for stereoscopic 3D-reconstructions. A lot of the early images are now declassified and can be obtained via the USGS (https://earthexplorer.usgs.gov/).
Benjamin showed us the results of a DAI program to collect and georeference these images for the entire north of Africa. He pointed out, that the original 70mm-films show transects of 200-300 km length. This means that apart from the perspective adjustment the georefencing has to adjust for the curvature of the earth. A tool that does that has now been developed for GRASS GIS and is available on Github (https://github.com/OSGeo/grass/tree/releasebranch_7_8). It will be part of the next release of GRASS GIS as part of the i.ortho-modules.
Finding islands in a DEM
Due to shortage of time we were not able to discuss the problem related to r.geomorphon posted earlier in May. We will do this at our next meeting.